Share your knowledge

Friday 30 December 2016

Structure of Android Application

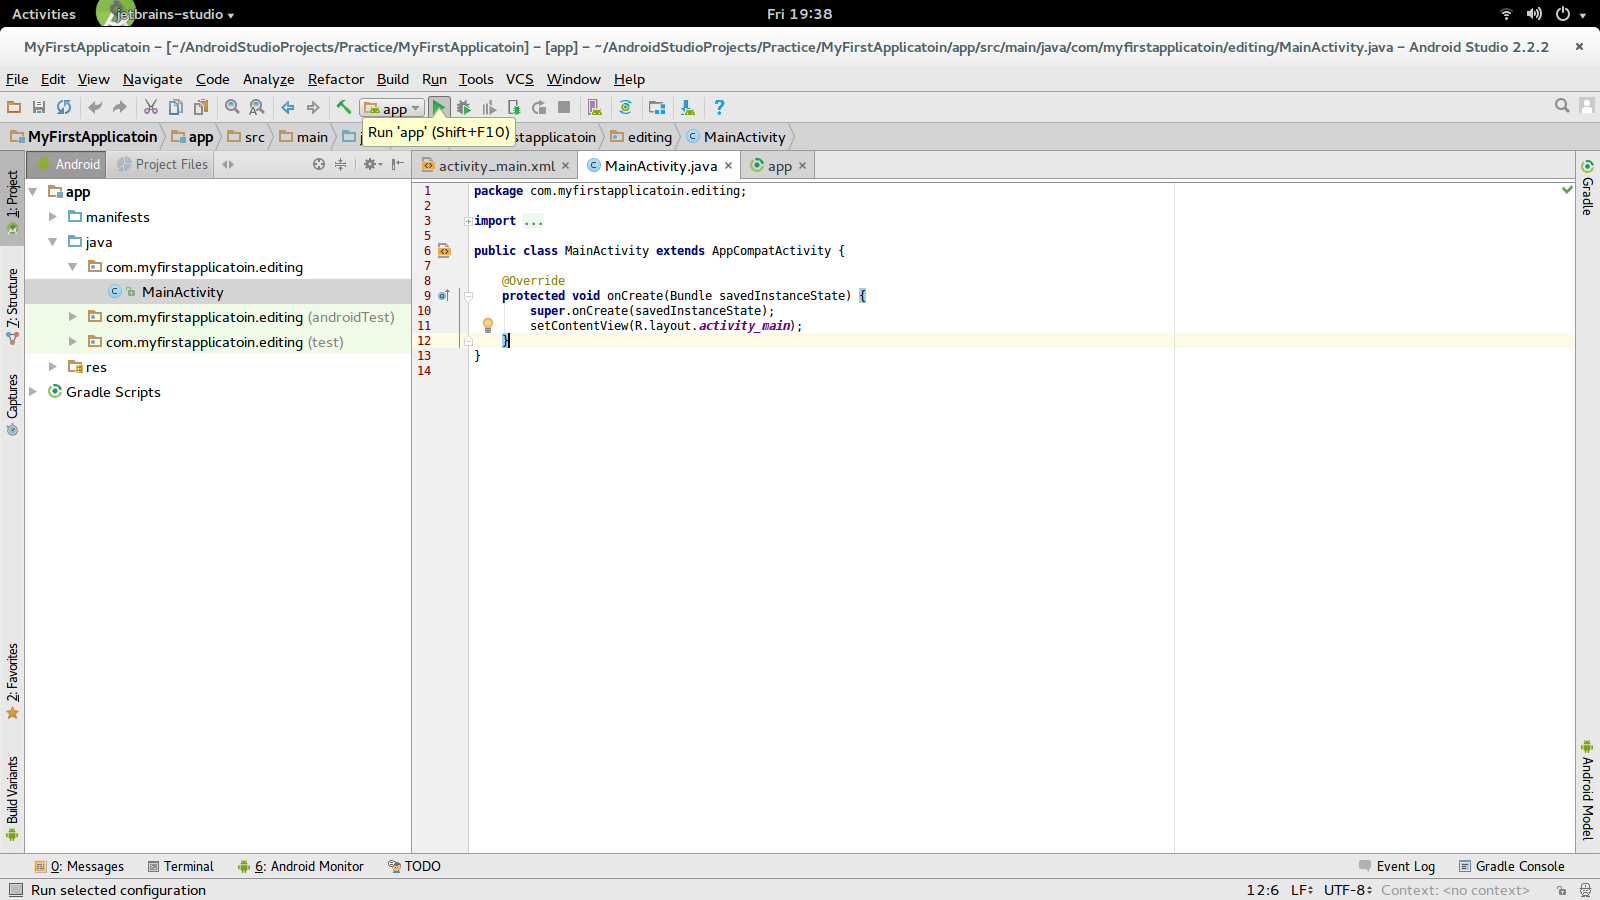
Below is the structure of an Android Project in Studio


1. MyFirstApplication: This is the project name we gave in the initial stage of creation.

2. Icon: The icon pointing in the second arrow is used to filter the project with different modules as below.
  • Project
  • Packages
  • Scratches
  • Android
  • Project Files
  • Problems
  • Production
  • Tests
  • Android Instrumentation Tests
3. AndroidManifest.xml: This file is located under manifests folder, every application must have an AndroidManifest.xml file (With the same name) in it's root directory. This file provides essential information about your app to the Android System, which the system must have before it can run any of the
application code.
  • Contains all the application components(Activities, Services, Broadcast Receivers, Content Providers etc.) 
  • Contains information of the package
  • It declares which permissions the application must have.
4. Java Folder: All the java files will present inside this folder. By default it contains three packages with the same name you specified while creating the project.

5. MainActivity: This is the Activity you specified while creating project. You can find this Activity inside AndroidManifest.xml.


Below code can be found inside AndroidManifest.xml


<activity android:name=".MainActivity">
    <intent-filter>
        <action android:name="android.intent.action.MAIN" />

        <category android:name="android.intent.category.LAUNCHER" />
    </intent-filter>
</activity>


We will discuss it briefly in the later sections.

6. (androidTest) and (test) packages: All the unit test related code will be present inside these packages.

7.res Folder: All the xml files will present inside this folder. By default few of the essential folders(drawable, layout, mipmap, values) and xml(activity_main, colors.xml, dimens.xml, strings.xml,styles.xml) files will be created.

8. drawable folder: Images you want to use in your application need to be placed here. we will discuss about it briefly later on.

9. layout folder: layouts will decide how our application user interface should look like, all the layouts will be created under this folder.

10. activity_main.xml: This is the file which decides how a screen(activity) should look like. An Activity with user interface should have a java file(in this case MainActivity.java) and an xml file(activity_main.xml).

11. mipmap folder: Here also we will keep images used in the application.
then, how are these mipmap images different from drawable images?
There are two cases you deal with when working with images in Android:
  1. If you want to load an image for your device density and if you are going to use it "as is", without changing its actual size, then you should work with drawables.
  2. If you want to load an image for your device density, but the image should to be scaled up or down. For instance this is needed when you want to show a bigger launcher icon, or you have an animation, which increases image's size. In such cases, to ensure best image quality, you should put your image into mipmap folder. What Android will do is, it will try to pick up the image from a higher density bucket instead of scaling it up. This will increase sharpness (quality) of the image.
    Note:
  • Launcher icons always go into mipmap folder.
  • Images, which are often scaled up (or extremely scaled down) and whose quality is critical for the app, go into mipmap folder as well.
  • All other images are usual drawables.
12. values folder: This folder contains other various XML files that contain a collection of resources, such as strings, colors, styles, dimensions etc

13.build.gradle: This is an auto generated file which contains compileSdkVersion, buildToolsVersion, applicationId, minSdkVersion, targetSdkVersion, versionCode and versionName, dependencies, etc. We will discuss about all of these in brief in later lessons.

 Few Java Basics Must know before starting to write something. 


Building Your First Application

Once Android setup is done, open android studio and follow below steps to create your first android Application.

1. Click on File -> New -> New Project as show below


Create New Project window will open now.

2. Configure your new project:

Enter Application name, Company Domain, Package name, Check include C++ support if you want to develop applications using C++, and select location where you want to save your project.

Application name: Enter name of your application

1. Name should not start with lowercase


2. Name can start with special symbols like ; , $, @ etc. as shown below


If we create project with this application name, then application will run and the name of the application will looks like below.


3. Name can consists of white spaces

4. No other project with same name should present in the same location.
 
Note: Enter Application name as "My First Application"

Company Domain: The domain name is used by Android Studio to generate a package name. Give whatever name you like to include in package.

1. It cannot start with special symbols
2. It can start with any letter ( either lower or upper case)
3. As we discussed domain name is used by Android studio to generate package name, what will happen if we enter some java keyword as domain name for example "super" or "case" etc ?
      Ans: As the package name should not contain java keywords, studio will automatically change package name to some other by adding some character. If we give super as domain name, then the package name will change to "asuper.myfirstapplication" as shown below.


Note: Keep "com" as Company Domain name for now

Package name: It is just a unique identifier for your application in the Google Play Store. It can be anything you want as long as it is unique. Generally, we use reverse domain names like com.something. or org.something.

1. We can edit package name using edit option in the right, once done click on done.

Include C++ Support: If you want to develop application in C++ then check it

Project Location: Choose a location where you want to put your applications.

1. Path of the location should not contain any white spaces.

 Click Next.

3. Select the form factors your will run on:

1. We can develop applications for
  • Phone and Tablet
  • Wear
  • TV
  • Android Auto
  • Glass
2. Check Phone and Tablet as we want to develop phone applications.

3. Minimum SDK - Lower API  levels target more devices, but have fewer features available. If you select API Level 18, the apps will not run on mobiles with lower API Levels.

Choose API 13: Android 3.2 ( Honeycomb ) for now.

Click Next


 4. Add an Activity to Mobile: We can select different Activities based on your application need.

Choose Empty Activity for now, click Next.


5. Customize the Activity: Enter Activity name and layout name.

Activity Name:  Enter name of the Activity, it should not start with special symbols and numbers.

Layout Name: Enter name of the layout, it should not start with special symbols, numbers and Uppercase letter.

Click on Finish


Once the Gradle build is done your project will open as below


Now Connect Mobile device to your system via USB.

Connecting mobile device to studio.

1. Connect Mobile and System with usb cable as shown below.


2. In the notifications we can see Connected as camera/Connected as Media, click on this notification

3. Select Camera and select USB debugging enabled


4. Now you can find your device connected in studio.  
 
Then click on on Run button in the top as shown below.


Hey.....Your first application on your/friend's mobile......Congrates....


Structure of Android Project:


Application Components


Application components are the essential building blocks of an Android application. These components are loosely coupled by the application manifest file AndroidManifest.xml that describes each component of the application and their interaction.

Four main Components are:

1. Activity
2. Service
3. Broadcast Receiver
4. Content Provider


Let's see simple and short descriptions of main components.


Activity: An activity represents a single screen with a user interface, Lets take an example of contact application, one screen will show all the contacts(Activity -1), clicking on  New contact will show another screen to add contact(Activity -2).

Activity -1


Activity -2 


Note: Activity serve as the entry point for a user's interaction with an app.

An Activity is implemented as a subclass of Activity class as below...

public class MainActivity extends Activity {
System.out.println("Building Activity");
}

Service: A service runs in the background to perform long-running operations. which doesn't contain any user interface. For example, a service might play music in the background while the user is in a different application.

other examples include: fetching wifi status, network status in the background.

A service is implemented as a subclass of Service class as below...


public class MyService extends Service {
System.out.println("Building Service");
}


Broadcast Receivers: These are registered for system announcements.
Ex: 1. When you plug-in a headset, headset icon will come in the status bar as below.


Mobile without headset connected


Mobile with headset connected

2. when you plug-in a charger, charger symbol will come
3. when you click on volume button to increase/decrease volume, how volume will get change?


Everything is done by Broadcast Receivers.

Note: It provides communication between android os and applications.

A broadcast receiver is implemented as a subclass of BroadcastReceiver class and each message is broadcaster as an Intent object.
  

public class MyReceiver  extends  BroadcastReceiver {
   public void onReceive(context,intent){}
}


Content Providers: A content provider supplies data from one application to other application on request. Such requests are handled by the methods of the ContentResolver class. It's not possible to share data from one application to another application without Content Resolvers.

use-case:  Getting all the contacts information from contacts application to What's app application.

A content provider is implemented as a subclass of ContentProvider class and must implement a standard set of APIs that enable other applications to perform transactions.


public class MyContentProvider extends  ContentProvider {
   public void onCreate(){}
}


We will check these components and other components in detail in their individual chapters.

 Let's build your first application


Advantages of Android


Advantages for developer:

1. Android is open source - source code is exposed to public

2. Application Framework ( Developer heart ) provides built in classes(Wifi
Manager, Location Manger)

3. DVM is optimized for mobile devices

4. SQLite Database is used to maintain structured data etc......

Advantages to mobile users/developers:

1. Biggest advantage is Android is from Google, the name Google provides lot of trust for users to buy android device.

2. Android is the most used mobile operating systems. It is used by more than billion people

3. Users can do lots of tasks at once - multitasking

4. Android Widgets makes the user experience much better and helps in doing multitasking.


Note:

1. Advantage for developer/ Disadvantage for user: Lot of advertisements in the applications

2. Disadvantage for developer and user: There are plenty of process running in the background which results in the quick draining of the battery. It is hard to stop these applications as the majority of them are system applications.

Application Components


Thursday 29 December 2016

Android Architecture

Knowing about Android Architecture is the first step to get into Android Applications development.

The following diagram shows major components of an Android platform.


Linux Kernel: The foundation of Android Platform is the Linux kernel which means others will relies on it to provide functionalities. It takes the responsibility to manage memory, resources, power with the help of different drivers( display, camera, blue tooth, wifi, audio, usb, keypad, display). Using Linux kernel allows device manufacturers to develop hardware drivers for a well-know kernel.

Libraries: On top of Linux kernel there is a set of libraries including Surface Manger, FreeType, well known library libc, SQLite database, libraries to play and record audio and video, SSL libraries responsible for Internet security etc.

Android Runtime: It contains two sections - Core libraries and DVM

Core Libraries: This contains java libraries that are specific to Android development such as java.io.*, java.net.* etc which will be useful for small scale applications. To work with Graphics, 2d drawings and other large scale applications we use native libraries like OpenGLES, Media Framework etc.

Dalvik Virtual Machine(DVM): As a Java developer we know that JVM( Java Virtual Machine) will generate .exe (executable) file by taking .class file generated by compiler as an input. Similarly in android DVM(specially designed for android) will take all the .class files and convert them in to a single light weight file named .dex (dalvik executable).

Why can't we use JVM: .exe files generated by JVM are heavy weight and the machine needs more memory, ram and power to run these files. So, DVM was specially designed for android as Android mobiles doesn't have that much memory capacity, power capacity and RAM.

Application Framework: Application Framework is the heart for Android Application Developers as it provides several high-level services to applications in the form of special Java classes. Developers are allowed to make use of these services in their applications.

use-case: It will be a 5 lines of code to get a list of wifi connections available around us using Wifi Manger available in Application Framework . But if we dont' use Wifi-Manger it may take more than 100 lines of code.

System Applications: The System applications include contacts, messaging, camera etc. These will function both as applications for users and to developers to access from their own apps. For example, if your app would like to share some data, you don't need to build that functionality yourself-you can instead invoke the apps capable to share data.


Advantages of Android

What is Android


Android is a mobile Operating system mostly used in smart phones and tablets.

Operating System: It is a system software that manages computer hardware and software resources.

Note: The name itself suggests that it is operating a system(can be anything)

Example or use-case of Operating System:

keep cloths inside a washing machine an sit calm without starting it, what will happen now? Nothing will happen its just a machine( hardware ) but whenever we switch it on we can hear some noise which indicates something is going on( something is operating inside ). It's operating system who instructs hardware to wash cloths using some set of instructions(program/software).

So, Operating system is an abstraction between hardware and software.


 Android Architecture